Troubleshooting a Cat 6 (or Cat 5) Network connection from the Network Switch to the Data Outlet and/or Computer can sometimes be very frustrating even for an experienced professional. If you think of a WIRED NETWORK CONNECTION as a chain made up of series of links, it will help you better visualize and understand the possible points of failure.
Each of the links is a potential point of failure and chances are that if challenged even many experienced technicians might not be able to name them all. Before we name all of the links, we will break them down into three main categories consisting of:
The Network Switch
The Connection Wiring and Hardware
The Network Device

In most cases, the trouble is typically found in the connection wiring and hardware. But don't let that throw you off, when you are troubleshooting you must exhaust all possibilities. Knowing the points will make you a better troubleshooter. Let's start from the Network Switch and name each link.
- The Network Switch itself and its connection to data sources
- The port on the front of the switch that you are connected to
- The RJ-45 Jack on the front of the switch that corresponds to the port you are connected to
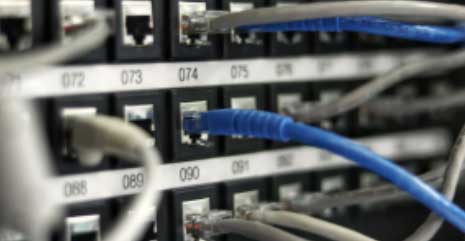
- The Cat 6 (or Cat 5) patch cable going from the switch to the patch panel (See Note 1 below)
- The RJ-45 Jack on the front of the Patch Panel
- The rear 110 connection corresponding with the RJ-45 jack on the front of the Patch Panel
- The Cat 6 (or Cat 5) cable going from the patch panel to the wall outlet
- The RJ-45 Keystone jack at the wall outlet
- The proper labeling of the correct Patch Panel Port on the Wall Outlet
- The Cat 6 (or Cat 5) patch cable going from the Wall Outlet to the computer. (See Note 1 below)
- The RJ-45 connector on the NIC Card
- The NIC Card itself
- The seating of the NIC Card into the internal connectors
- The PC itself
 Notes 1
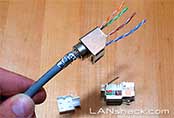
When you are assessing the condition of Patch Cords, think of them as three points including the RJ-45 connector on one end, the connecting cable, and the RJ-45 connector on the other end. Occasionally a defective patch cord will test fine when straight but not work when bent near one of the connectors (or visa-versa).
So there are basically fourteen points of possible failure. But don't worry, most of the time it is usually not necessary to check them all. Your approach should vary based on one of the following three scenarios:
A newly installed cable

An existing but unused data outlet

A data outlet and computer that had been
working ok but suddenly stopped working
on the network
By considering one of the three scenarios above will help you in your approach in troubleshooting the problem. For example, 1 & 2 are most suspect for incorrect labeling while #3 can be any of the following:
A cut cable.
A newly installed electric cable that was run parallel to the suspect cable.
Newly installed data cables that were run parallel to the suspect cable.
Problems with the switch or switch port. Try restarting the switch.
Computer needs to be rebooted.
Testing the Cable Link
If you think about it, the Cable Link is just a long data extension cord with an 8-pin RJ-45 jack or plug on each end. Thinking of it in this manner simplifies it and makes it easier to visualize.
Are you certain that you have the right cable? If you are unsure than use a Tone Generator & Probe to make a positive ID. * Note that an ID made by a tone generator and probe will ID the cable but not tell if it is properly wired. For that you need a 4-pair cable tester.
If you test the cable and do not get good continuity than examine the connectors or patch panel port on each end. Replace or re-terminate them as necessary. If it tests good than try the continuity again but this time with and through the patch cords on each end.
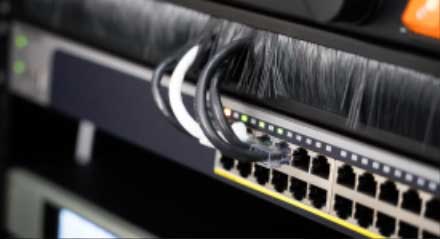
If your problem is intermittent or slow data, try releasing (or removing) cable ties on the bundle of cables coming into the patch panel. Cables that are tightly bundled frequently exhibit high levels of crosstalk between them. The effect increases with longer bundles of cables that are tightly bundled.
Notes
Note that if the cable (including patch cables) tests good for proper continuity that the cause is most likely either the switch or excessive crosstalk.
TIP: Use Velcro cable ties instead of vinyl ties as vinyl ties can crimp the cables causing excessive crosstalk.
 Most likely causes of failure
Patch Cables
Mislabeled Jack (outlet)
Bad jack, connector or patch panel port
Crosstalk caused by a kink in the cable or from an adjoining cable.
 Still stumped?
Try a different switch port
Replace the patch cables on both ends
Replace the jack, connector(s) or patch panel port
Try a different computer
Install a new cable (last resort)
In the event that you decide to run a new cable, you should strongly consider shielded cable as it is much less effected by electrical noise and crosstalk.
In Closing
Troubleshooting wired network connections can often be frustrating. If you keep your cool and be logical you will find and correct the cause of the trouble. Try to act as a detective and ask questions like is the problem slow or no service, was it working previously, are any other connections out or just this one etc. By knowing all of the possible causes and eliminating them one by one can lead you to correcting the problem more quickly and with less frustration.
Related Tutorials